
Use Dog now!
Are you eager to experiment? Do you want to start using the Dog Gateway now? Here you can find some easy recipes to getting you online with your brand new Dog installation!
Warm up!###
Do you already have a platform for running the gateway? Which technology do you want to interface? Before downloading the latest version, check the hardware and software environment in which you plan to run the gateway.
Minimum Requirements
- Java Runtime Environment v1.6 or greater
- 256 MByte of system memory (actual memory required by the gateway depends on the configuration and typically ranges between 40 and 120 MBytes).
- 64 MByte of storage (typically)
- Ethernet connection (to access the gateway, and to connect to the automation networks)
Download
Download the latest release from GitHub. If you are planning to run the Dog Gateway on Raspberry Pi you might want to check the additional information. Check which technology drivers are available and choose the ones you prefer; download the latest releases on the corresponding drivers repositories:
Debian packages
Dog is now available as a Debian package usable for Debian-related distros. Packages have been tested with:
- Ubuntu Linux
- Raspbian Buster
The last available version is:
Whereas older versions can be found here:
- Dog 3.0.2
- Dog 3.0.3
- Dog 3.0.4
- Dog 3.1.0
- Dog 3.1.1
- Dog 3.1.2
- Dog 3.2.0
- Dog 3.3.0
- Dog 3.4.0 - md5
- Dog 3.4.1 - md5
- Dog 3.5.0 - md5
- Dog 3.5.1 - md5
- Dog 3.5.2 - md5
- Dog 3.5.4 - md5
- Dog 3.5.5 - md5
- Dog 3.5.6 - md5
- Dog 3.5.7 - md5
- Dog 3.5.8 - md5
- Dog 3.5.9 - md5
Installation
Once downloaded the latest Debian package, copy it to your target, DEBIAN-based, system and type:
sudo apt install ./dog-oss.deb
After the end of the installation process your instance of Dog should be running as a service (named dog-gateway) and you should be able to access its diagnostic interface at the 8080 http port:
- http://
:8080/admin/ui/index.html
Please notice that the current package contains only a limited subset of the Dog packages. Complementary packages will be released soon to add functionalities to the core Dog distribution.
Installation from sources
Ok you’ve got the latest release, what to do next?
- Uncompress the release file in the directory in which you want to install the gateway (or move it later to the right place); e.g.,
unzip dog-3.2.0.zip - If you downloaded some additional drivers, uncompress the driver files in a temporary folder, and move them to the
driverssub-directory located in the dog installation folder.
unzip zwave-drivers.zipcp zwave-drivers/*.jar dog/drivers
Configuration
Check configuration details for each technology on the corresponding driver page on GitHub:
or have a look at the sample configurations:
- BTicino MyHome
- KNX
- Echelon
- Modbus
- Z-Wave
For any additional module (bundle) you download, check the installation and configuration instructions on the corresponding GitHub repository.
Configuration Anatomy
The Dog Gateway configuration is stored under the folder named configuration, and has the following structure:
configuration
	|--- config
	|	 |--- com.eclipsesource.jaxrs.connector.cfg
	|	 |--- it.polito.elite.dog.addons.[addon configuration files]
	|	 |--- it.polito.elite.dog.core.housemodel.simple.cfg
	|	 |--- it.polito.elite.dog.core.log.console.cfg
	|	 |--- it.polito.elite.dog.drivers.[technology].[driver configuration files]
	|	 |--- home.xml
	|	 |--- [localRuleStore.xml]
	|	 |--- ...
	|
	|--- config.ini
While the config.ini file usually does not need any change (and, vice-versa, any wrong modification may compromise the gateway execution), files inside the configuration folder provide parameters to tune-up the gateway modules and might need to be changed depending on the specific installation.
Among the available files, two main types can be identified: .cfg files and .xml files. The former uses a key = value format to specify configuration parameters needed by the gateway bundles (either to run, or to tune-up their runtime execution).
File belonging to the latter, instead, provide extensive configuration data, e.g., the home configuration in terms of devices and locations, the set of rules to be executed, etc. They are typically pointed by some parameters specified in .cfg files.
To better understand the files structure, let us explain one of the most important configuration files, the it.polito.elite.dog.core.housemodel.simple.cfg which provides details about the home managed by the Dog Gateway.
Such a file is organized as follows:
# Home configuration file
# xml files might also be in external directories e.g., /data/dog-config/
DEVICES=home.xml
SVGPLAN=simple_home.svg
where configuration parameters are on the left and values are on the right, separated by a “=” sign.
In this specific case, the first configuration parameter DEVICES = home.xml identifies the name and location of the home configuration file (home.xml).
Such a file defines the environment structure and the set of devices installed inside the environment. For example, the following excerpt shows a home configuration for one room and with some Z-Wave devices installed.
<?xml version="1.0" encoding="UTF-8" standalone="yes"?>
<dhc:dogHomeConfiguration xmlns:dhc="http://elite.polito.it/dogHomeConfiguration">
<dhc:buildingEnvironment>
    <dhc:building id="Case">
        <dhc:flat id="ZWAVE_Demo" class="Flat">
            <dhc:room id="demo_room" class="StorageRoom">
                <dhc:ceiling id="ceiling" class="Ceiling"/>
                <dhc:floor id="floor" class="Floor"/>
                <dhc:wall id="wall" class="Wall"/>
            </dhc:room>
        </dhc:flat>
    </dhc:building>
</dhc:buildingEnvironment>
<dhc:controllables>
    <dhc:device class="ZWaveGateway" id="zwave-gateway" domoticSystem="ZWave">
        <dhc:description>The ZWave X gateway
		</dhc:description>
        <dhc:isIn>demo_room</dhc:isIn>
        <dhc:param name="NodeID" value="1" type="network"/>
        <dhc:controlFunctionality class="AssociateFunctionality">
            <dhc:commands>
                <dhc:command class="AssociateCommand" name="AssociateCommand_zwave-gateway"
                	id="AssociateCommand_zwave-gateway">
                    <dhc:param name="realCommandName" value="associate"/>
                </dhc:command>
                <dhc:command class="DisassociateCommand" name="DisassociateCommand_zwave-gateway"
                	id="DisassociateCommand_zwave-gateway">
                    <dhc:param name="realCommandName" value="disassociate"/>
                </dhc:command>
            </dhc:commands>
        </dhc:controlFunctionality>
    </dhc:device>
    <dhc:device class="LampHolder" id="Lamp_Holder" domoticSystem="ZWave" gateway="zwave-gateway">
        <dhc:description>A MainsPowerOutlet instance named
			MainsPowerOutlet_ZW1
		</dhc:description>
        <dhc:isIn>demo_room</dhc:isIn>
        <dhc:param name="NodeID" value="4" type="network"/>
        <dhc:param name="InstanceID" value="0" type="network"/>
        <dhc:controlFunctionality class="OnOffFunctionality">
            <dhc:commands>
                <dhc:command class="OffCommand" name="OffCommand_Lamp_Holder"
                	id="OffCommand_Lamp_Holder">
                    <dhc:param name="realCommandName" value="off"/>
                </dhc:command>
                <dhc:command class="OnCommand" name="OnCommand_Lamp_Holder"
                	id="OnCommand_Lamp_Holder">
                    <dhc:param name="realCommandName" value="on"/>
                </dhc:command>
            </dhc:commands>
        </dhc:controlFunctionality>
        <dhc:notificationFunctionality class="StateChangeNotificationFunctionality">
            <dhc:notifications>
                <dhc:notification class="StateChangeNotification"
                	id="StateChangeNotification_Lamp_Holder">
                    <dhc:param name="nParams" value="1"/>
                    <dhc:param name="notificationName" value="stateChanged"/>
                    <dhc:param name="notificationParamName" value="newState" type="State"/>
                </dhc:notification>
            </dhc:notifications>
        </dhc:notificationFunctionality>
        <dhc:state class="OnOffState">
            <dhc:statevalues>
                <dhc:statevalue class="OffStateValue" name="off"/>
                <dhc:statevalue class="OnStateValue" name="on"/>
            </dhc:statevalues>
        </dhc:state>
    </dhc:device>
    </dhc:controllables>
</dhc:dogHomeConfiguration>
Wireless network such as ZigBee and Z-Wave typically support automatic device discovery (when the devices join the network).
In these cases, the home.xml is automatically populated with descriptions of newly discovered devices.
Instead, wired automation networks require this file to be edited manually.
Detailed instructions on the compilation of the home configuration file could be found in the driver’s wiki, detailed per each supported device.
Run
Once set-up the configuration, Dog can be run by simply typing ./start-dog.sh (on the terminal) in the gateway root folder.
Microsoft Windows users could do the same by renaming the the start-up script to start-dog.bat and by running it.
Control you environment
You are now ready to control your environment through Dog.
Open-up a browser and type:
http://<dog-ip-address>:8080/admin/ui/index.html
(if you are running Dog in the same machine in which you open the browser the <dog-ip-address> will be localhost).
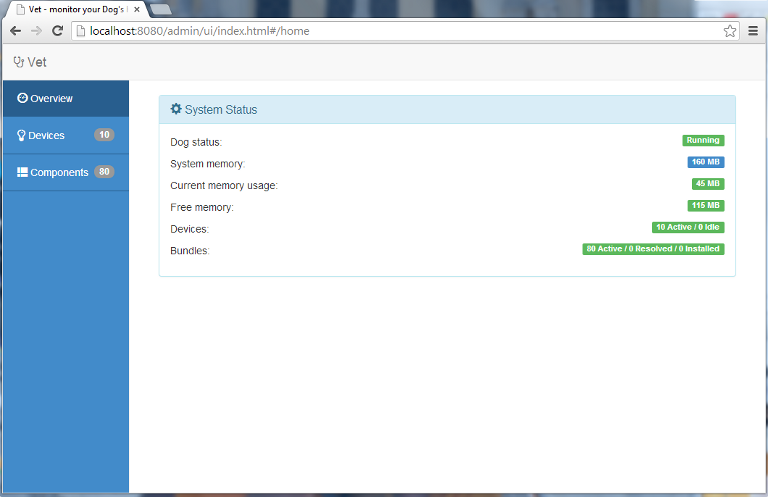
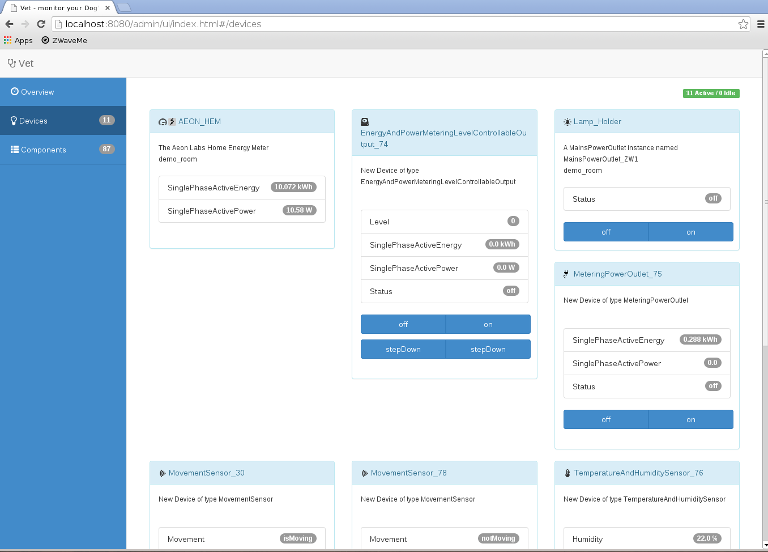
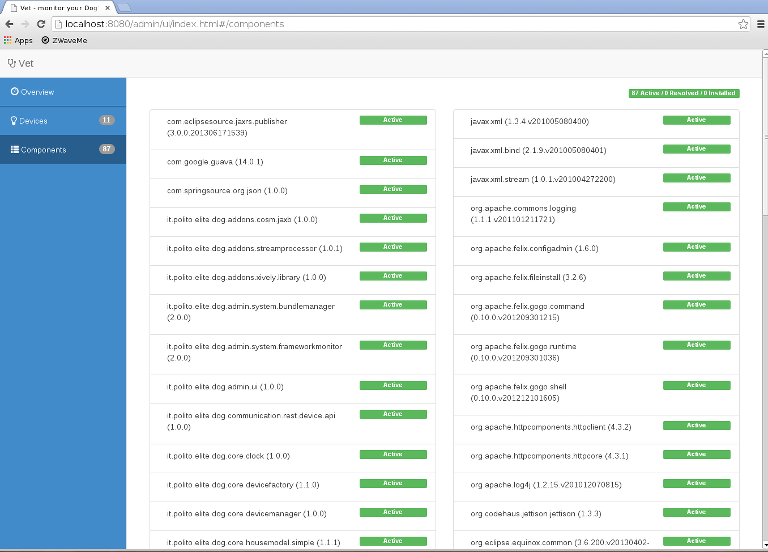
You will get access to Vet (The Dog Veterinary): the diagnostic and administrative interface of Dog (see the screenshots below).
Vet is organized in three sections:
- Overview
- Provides a quick overlook on the current gateway status reporting useful information such as the system memory occupation, the number of devices registered in Dog (active) and the number of components (bundles) currently enabled and running (might vary depending on installed drivers and addons).
- Devices
- Provides information on the devices currently managed by the Dog Gateway. For each device provides a constantly updated view of the device status and offers means to perform simple actions, e.g., switching on/off, etc.
- Components
- Offers a focus on the installed gateway components, reporting the name and status (green - ok, yellow - warning, red - severe issues are occurring) of each available bundle. May be used to diagnose malfunctions or issues.
Want more?
-
You can post you consumption data on Xively.com by downloading and adding the xively client component. You can check our in-house gateway data on Xively, or you can ask us for a product serial to set-up your data-sharing on Xively (see the addons documentation for more details).
-
An Android app for Dog is under development, read our blog or follow us on Twitter for latest updates.